4: Menu

4: Menu Keyboard Shortcuts
4:1: IBVA
4:2: File
4:3: Graph
4:4: Edit
4:5: Format
4:6: Recording
4:7: Brain VJ
4:8: Tools
4:9: Windows
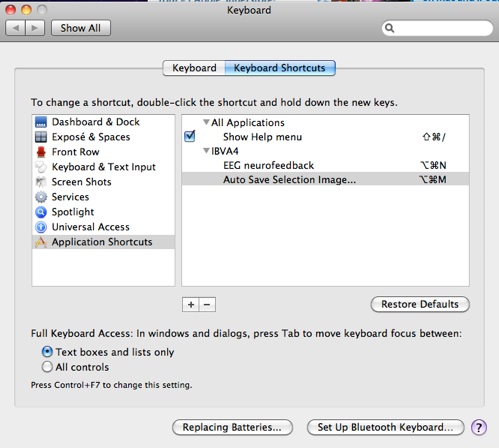
4 : Menu Keyboard Shortcuts
With OSX10.5, 10.6, 10.7 we can make own Keyboard Shortcuts.
Open System preference “Keyboard / Keyboard Shortcuts”.
Select “Application Shortcuts”.
Select “IBVA”.
Then type menu and/or sub menu name with keyboard command.
After set this we can use new Keyboard Shortcuts with IBVA application.
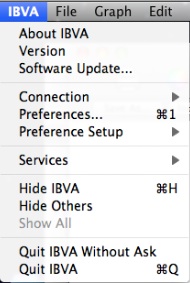
4.1: IBVA
4.1.1: About IBVA
Select "About IBVA" shows the About IBVA window.
4.1.2: Version
Select "Version" shows IBVA version.
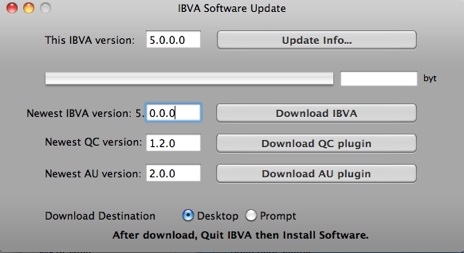
4.1.3: Software Update...
Select "Software Update..." shows Software Update window.
Automatically shows newest version information for IBVA, Quartz Composer plugins and Audio Unit plugins.
Click to start download of software.
After downloading, Quit IBVA and/or Quartz Composer and/or any applications using Audio Units and QuickTime.
Then Install software.
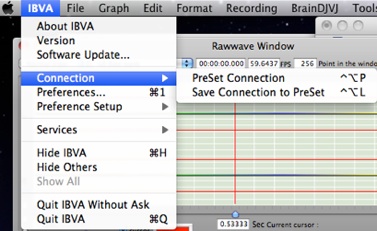
4.1.4: Setup
Connection. PreSet Connection and Save Connection to PreSet.
Connection / PreSet Connection :
Auto port connection works with following system condition.
A: new BlueTooth system. Port name must be :
"BlueVAS_H-Data" or "BlueVAS_H-Data-1".
only one Bluetooth IBVA system is set up.
B: Need to use keyspan 19, 28, 49, and/or IOGear -232A USB serial adapter, 1 ch and/or 2 ch system.
And no other USB adapter (keyspan and/or IOGear -232A) connected for other use.
Need to select adapter that works with OSX version.
An alternate system configuration can be setup by editing:
5: Preferences/5.3: Device setup - for select Port ON.
Then can save this use “Connection / PreSet Connection”
First time select :
Connection / PreSet Connection
ask you for make auto port connection. In case process this and succeeded this then automatically save connection information in to PreSet file.
After setup this not asking for auto port connection again.
Just select this menu makes connection of port.
In case not succeeded this, check followings and manually make connection then use Save Connection to PreSet menu.
1: make sure IBVA hardware Power is ON and OK.
2: System Preferences / Bluetooth --> delete “BlueVAS-H” connection.
3: then make new “BlueVAS-H” connection.
4: Open IBVA / Preference Setup -> Device & Port Connection
select popup menu “BlueVAS_H-Data” port and make “Port 1 ON”.
5: in case succeeded this use menu “Save Connection to PreSet”
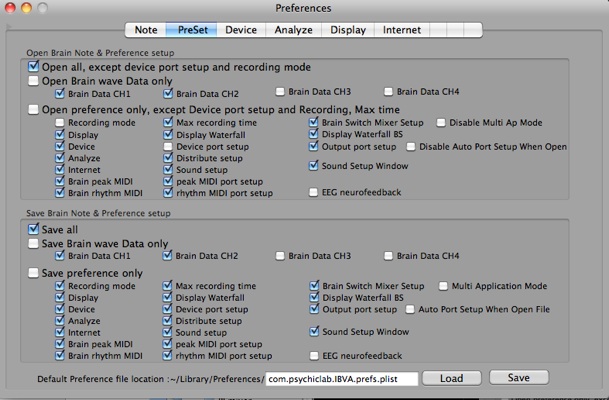
Save Connection to PreSet:
Select this menu save preset.
PreSet dictionary file is "Users / Library / Preference / com.psychiclab.IBVA.prefs.plist".
See 5.2: PreSet.
This preference file name and it's location is :
~/Library/Preferences/com.psychiclab.IBVA.prefs.plist
Save this preference file with "Preference/PreSet" window. This preference file is not automatically saved.
Other preference file "com.psychiclab.IBVA.plist" is automatically saved as it is used by IBVA application.
Customer can not change this preference file.
Only com.psychiclab.IBVA.prefs.plist can modify preference dictionary to be saved and opened by customers.
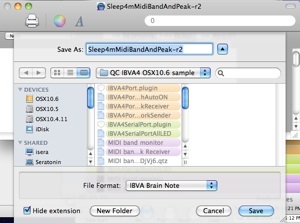
“IBVA Brain Note” file contains a preference dictionary with Brain Data that can be saved to any location use menu File / Save As... Select File Format “IBVA Brain Note” To open this preference dictionary - File / Open.
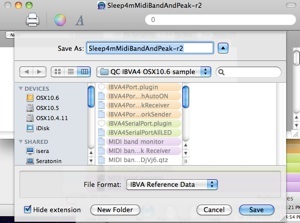
Also “IBVA Reference Data” file contains a preference dictionary without Brain Data that can be saved to any location use menu File / Save As.... Select File Format “IBVA Reference Data”. To open this preference dictionary - File / Open.
See 4.2.4: Preset for Load / Save.
Default preference dictionary is ~/Library/Preferences/com.psychiclab.IBVA.prefs.plist
User can change file name.
This preset setup and load / save function is for special use. not recommended to use for general use and not guaranty to work correctly.
4.1.5: Preferences...
Select "Preferences ..." shows Preferences window.
See 5: Preferences.
4.1.6: Preference Setup
Show Preferences Setup window.
PreSet
Device & Port
Analyze, Filter & FFT
Display
Internet
Brain peak MIDI
Brain rhythm MIDI
See 5: Preferences.
4.1.7: Hide IBVA
Hide IBVA.
4.1.8: Hide Others
Hide Others.
4.1.9: Show All
Show All.
4.1.10: Quit IBVA
Quit IBVA application.
There are two warnings to save data before quitting.
One is from BrainNote document in case you like to save any changes.
Other one is from "script" window. (small window that use for Apple script communication). Usually just clicking "Don't Save" is fine.
In case you like to save data, select "Brain Note" window then save data before Quit.
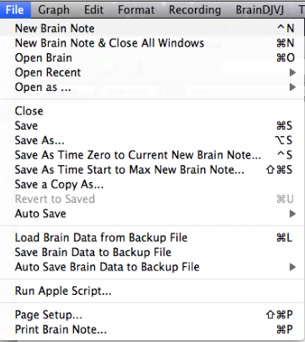
4.2: File
4.2.1: New Brain Note
Select "New Brain Note" shows Brain Note document.
Use to create text, graph note and setup for interactive brain switches.
All brain wave data and preferences setup information will be stored in this file.
See 11: New Brain Note
4.2.1.1: New Brain Note & Close All Windows
4.2.2: Open Brain
Select "Open Brain" shows Open window dialogue to select Brain Note files.
The last opened file will play back from the start.
All preferences setup will be reset as setup by 5: Preferences/Preset.
See 5: Preferences/Preset.
File Type to open is "IBVA Brain Note".
"Brain Note" document shows graph image and text. Also this is where brain data is saved and for play back, buffer & preferences information.
4.2.3: Open Recent
Select "Open Recent -> XXXX" Opens the Brain Note file name "XXXX"
The previously opened file will play back and all the preferences setup will be from that previously opened file.
Open file dictionary selection will be by 5: Preferences/Preset setup.
See 5: Preferences/Preset.
File Type to open is "IBVA Brain Note".
"Brain Note" document shows graph image and text. Also save brain data to play back buffer & preferences information.
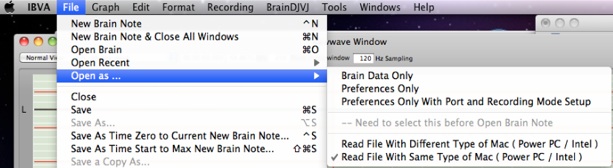
4.2.4: Open as ...
each time need to select this option before open file, otherwise set Preference/PreSet to set preset.
Select "Brain Data Only" then select "Open Brain Note" to open file :
File will load only brain data. then play it from start, without being customized by a preference setup.
Select "Preference Only" then "Open Brain Note" to open file :
File will load only preference. no effect to recording status.
Select "Preference Only with Port and Recording Mode Setup" Next you need to "Open Brain Note":
The file will load preferences and set port and recording mode as in the file.
Start as Recording mode from time 0.
Sampling speed, filter frequency and Max recording time will set as in the file.
* to use this option need to setup same hardware and port name configuration and turn IBVA power ON.
-
*This port setup mechanism is different than use
-
*/IBVA/Connection/PreSet Connection menu.
Can use for any port name configuration, included Output Port setup.
( /IBVA/Connection/PreSet Connection menu operation is limited port name and device use )
Different ways to turn IBVA BlueVas port ON: ( remember IBVA transmitter must already be on, green LED showing )
1: Select "IBVA/Connection/PreSet Connection" – if you try to turn port ON with an unknown port device hardware connected will give limited device use or not work at all.
2: Set "Device & Port setup" and load preference by clicking "Load" at the bottom of the menu for "Preference/PreSet" (set the same port position in the preference to turn this port ON)
3: Set "Device port setup" and load preference then "File/Open Brain Note" - set the same port position in the preference to make port ON. Cannot use for unknown device setup system.
4: Set "File/Preset for Open/Preference Only With Port Setup" then "File/Open Brain Note" - set the same port position in the preferences to actually turn the port ON.
See 4.1.3: Setup also
Read File With Different Type of Mac ( Power PC / Intel )
Read File With Same Type of Mac ( Power PC / Intel )
Default is selected "Read File With Same Type of Mac".
Use same type of Mac then no need to use this menu.
Only in case you like to read Brain Note file which created by Different type of Mac then need to select "Read File With Different Type of Mac".
Mac type is Power PC and Intel CPU.
4.2.5: Close
Select "Close" to close the front window.
4.2.6: Save
Select "Save" shows "Save dialog window" - type file name and save, in case Brain Note document is 'Untitled'.
In case not 'Untitled' then save all new data into the same Brain Note file without showing "Save dialog window".
Save file dictionary is selected by 5: Preferences/Preset setup.
See 5: Preferences/Preset.
Graphic image, text on the Brain Note document and brain data (0 to current time point) & preferences information will be saved to the one Brain Note file.
NOTE: to save long time (over one hour) brain data file.
Max 8 hours recording when 2ch save. (120 Hz sampling).
Max 4 hours recording when 2ch save. (240 Hz sampling). (when use Bluetooth IBVA)
Max 2 hours recording when 2ch save. (480 Hz sampling). (when use Bluetooth IBVA)
Brain wave Data size: about 50 MB for 2 Channel 4 hours recording. (120 Hz sampling).
4.2.7: Save Start To Max...
Save start time to Max buffer size. ( choose 4 hours for longer recordings, or 8 hours for sleep sessions )
Newest Brain Note document will be saved even if it is not in front most window.
4.2.8: Save as ...
Select "Save as..." shows Save dialog window where you type the file name and save.
Save document dictionary is shown in 5: Preferences/Preset setup.
See 5: Preferences/Preset.
Graphic image, text on the Brain Note document and brain data (0 to current time point) & preferences information will save to the one Brain Note file.
“IBVA Brain Note” file contains a preference dictionary with Brain Data that can be saved to any location use menu File / Save As... Select File Format “IBVA Brain Note” To open this preference dictionary - File / Open.
Also “IBVA Reference Data” file contains a preference dictionary without Brain Data that can be saved to any location use menu File / Save As.... Select File Format “IBVA Reference Data”. To open this preference dictionary - File / Open.
“IBVA Reference Data” file ICON :
Within Save Dialog, select popup menu File Format : "IBVA Reference Data" save only reference data file.
Within Save Dialog, select popup menu File Format : "IBVA Brain Note" save brain data and reference data.
4.2.9: Save a copy as ...
Select "Save a copy as..." shows Save dialog window to type file name and save.
Save document dictionary is shown in 5: Preferences/Preset setup.
See 5: Preferences/Preset.
Graphic image, text on the Brain Note document and brain data (0 to current time point) & preference information will be saved to the one Brain Note file.
Also can choose File Format "IBVA Brain Note", "Apple PDF pasteboard type" or "NeXT TIFF v4.0 pasteboard type".
In case choose "Apple PDF pasteboard type" or "NeXT TIFF v4.0 pasteboard type", then only Graphic image and text on the Brain Note document will be saved.
4.2.10: Revert to Saved
Doesn't work.
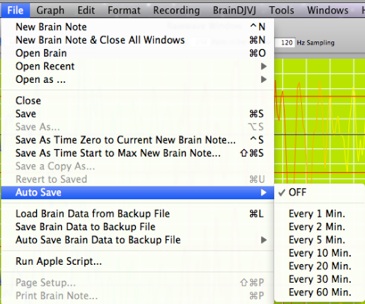
4.2.11: Auto Save
Default is OFF.
before set this make sure you like to Auto Save Brain Note file or Reference file.
Recommended to set Reference file for this use.
4.2.12: Load Brain Data From Backup File
Load brain data from backup file. Then play it.
4.2.13: Save Brain Data to Backup File
Save brain data to backup file.
4.2.14: Auto Save Backup File
Auto save brain data to backup file. Default is every 2 min.
In case you don't want to use this function set "OFF"
This function works nice way with OSX10.5, 10.6 and 10.7.
4.2.15: Run Apple Script...
Shows Run window for select Apple Script file.
Double click apple script file to run script.
how to use IBVA Apple script:
/Applications/IBVA4/IBVA.sdef
sample file is:
/Applications/IBVA/applescript sample
also any other apple script will run.
4.2.16: Page Setup...
Select "Page Setup..." shows Page setup dialog.
Only works for Brain Note document.
4.2.17: Print Brain Note...
Select "Print Brain Note..." shows Print dialog.
Only works for Brain Note document.
Brain bar graph image in the Brain Note document is not able to print by this menu.
To print Brain bar graph image in the Brain Note document need to use "Graph/Grab & Save".
Can save to PDF file.
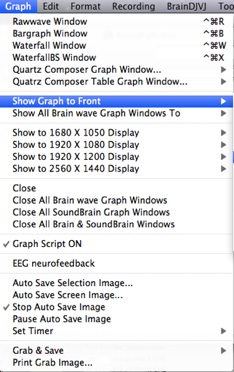
4.3.1: Graph
4.3.1: Graph Windows
Select "Graph/Rawwave Window" shows Raw Wave Graph.
See 6: Raw wave.
Select "Graph/Bargaph Window" shows 2D Bar Graph.
See 7: Bar Graph.
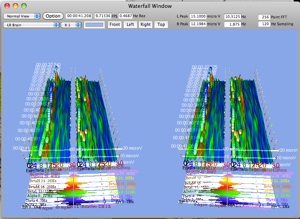
Select "Graph/Waterfall Window" shows 3D Water Fall Graph.
See 8: Water Fall.
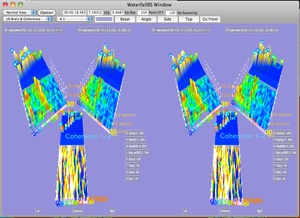
Select "Graph/WaterfallBS Window" shows 3D Water Fall BS Mixer Graph.
See 9: Water Fall BS Mixer.
Select “Quartz Composer Graph Window... " -> Graph 1, 2, 3, 4, 5, 6 Open Graph...
shows Quartz Composer Graph Window 1, 2, 3, 4, 5, 6 and/or Open QC Graph.
Select “ Quartz Composer Table Graph Window... " -> Graph 1, 2, 3, 4, 5, 6 Open Graph...
shows Quartz Composer Table Graph Window 1, 2, 3, 4, 5, 6 and/or Open QC Graph.
To Open QC Graph file need to make this file by your self.
QC Graph folder that is inside of IBVA4 folder has few QC graph.
IBVA application send Brain and Sound data to QC file.
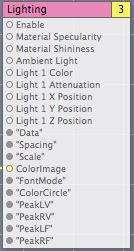
Data, Spacing, Scale, ColorImage, FontMode, ColorCircle, PeakLV, PeakRV, PeakLF, PealRF is data to QC file from IBVA application. You can make brain and sound interactive QC file that use this data.
See 9.5: Quartz Composer Graph Window
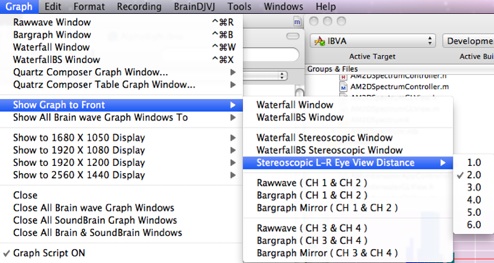
4.3.2: Show Graph to Front -> select Graph Window
Graph Window shows front most.
Stereoscopic Window menu :
Waterfall Stereoscopic Window WaterfallBS Stereoscopic Window
To see stereoscopic image need to connect Mac’s video output to 3D TV that use HDMI adapter.
3D TV need to set “side by side” input signal.
Stereoscopic L-R Eye View Distance : default is 2.0
in case object is close then need to select small number.
in case object is far then need to select big number.
To move Waterfall & WaterfallBS object : Left, Right, Up, Down
Left : ‘left arrow key’ , Right : ‘right arrow key’, Up : ‘up arrow key’, Down : ‘down arrow key’
To move Waterfall & WaterfallBS object : Close and Far
Close : ‘Shift & up arrow key’, Far : ‘Shift & down arrow key’
To rotate Waterfall & WaterfallBS object :
Use mouse click drag move left and/or right side of window. both side works same.
Also WaterfallBS object can use auto rotate in the Option setup.
Show transparent window :
Rawwave, Bargraph, Bargraph Mirror
Show Graph Windows :
Select "Show All Brain wave Graph Windows To -> 1440 X 900, 1366 X 768, 1280 X 1024, 1280 X 800, 1024 X 768, 1024 X 640 :
shows Raw Wave, BarGraph, Water Fall, Water Fall BS Mixer and Control Panel windows in that window size.
Select “Show to 1680 X 1050, 1920 X 1080, 1920 X 1200, 2560 X 1440 Display” shows all graph windows
Select "Close" close front window
Select "Close All Bain wave Graph Windows"
Select "Close All SoundBrain Graph Windows"
Select "Close All Brain & SoundBrain Graph Windows"
4.3.3: Graph Script ON
Select "Graph Script ON" to shows Apple Script document window. Default is ON (Open).
Can not edit this window. Need to show this window for Apple Script operation.
In case close this window then need to Select "Graph Script ON" again for use Apple Script.
Recommended to open this (ON this) always, because Apple script use inside IBVA application too.
Apple Script Documentation:
IBVA.sdef
4.3.4: Show EEG neurofeedback Window
Select "Graph/EEG neurofeedback" shows EEG neurofeedback tools.
Select “Graph/EEG neurofeedback Speech Window..." shows EEG Speech Window.
Select “Graph/Close All EEG neurofeedback Speech Window" Close EEG Speech Window.
See 10: EEG neurofeedback.
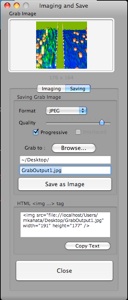
4.3.5: Grab & Save
Window : select window will grab
Selection : Shows selection tool to select image rect.
Screen : Screen image Grab
Timed Screen : 10 second latter's Window image Grab.
Grab Sound ON/OFF : Grab sound on / off
After Grab image, shows grab image in the "Grab Image" window.
And auto save image file as GrabOutputX.jpg. X is number of times grab.
Click "Save Image" save image to "~/Desktop/GrabOutput.jpg". Type name can set save file name.
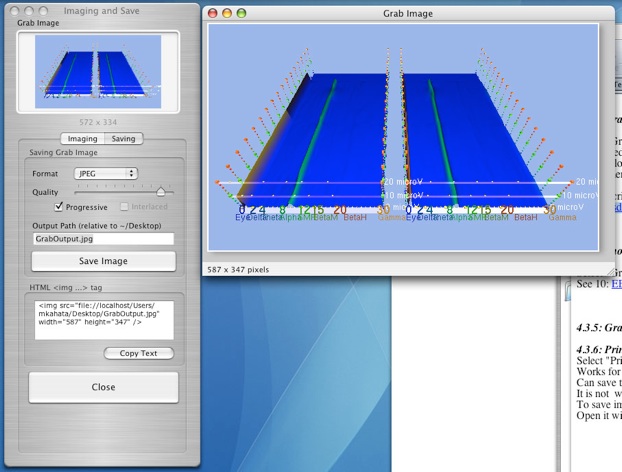
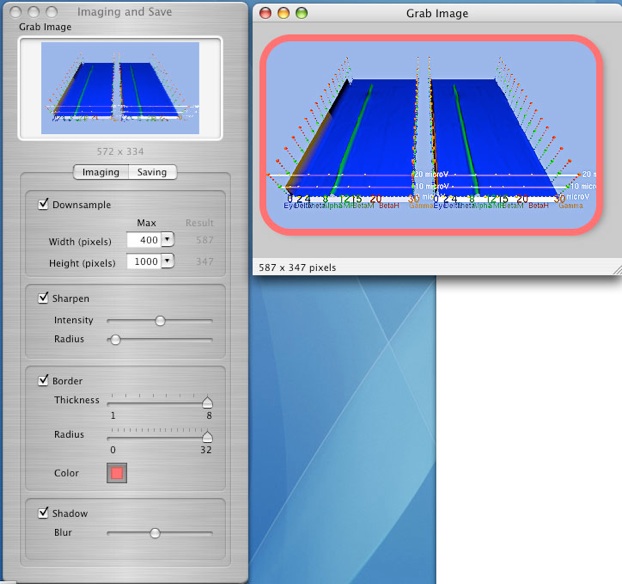
Click "Imaging" for reduce image size, image Sharpen, Border, Shadow effect.
4.3.6: Print Grab Image...
Select "Grab Image" window to front.
then
Select "Print Grab Image..." shows Print dialog.
Can save to PDF file.
To save and/or print Graph image, need to Grab Image first, then save and/or print with Grab Image window.
4.3.7: Auto Save Selection Image...
Selection image will be auto save by timer setup. ( use transparent window to set region and set destination folder for save images that use Imaging and Save Window’s “Browse...” Button. )
Max about 1 hour for this operation. (when timer set is 10 sec): depend on size of Image.
Max about 6 hours for this operation. (when timer set is 60 sec): depend on size of Image.
then need to re-start IBVA4.
Each time when start save image all graphic display update will stop few second.
You can see the images using Preview as slide show, etc.
Load in iPhoto to see images clearly.
4.3.8: Auto Save Screen Image...
Main screen will be auto-saved by timer setup.
Max about 1 hour for this operation. (when timer set to 10 sec) : depend on size of Screen.
then need to re-start IBVA4.
Each time start save image all graphic display update will stop few second.
4.3.9: Stop Auto Save
Stop auto save
4.4.0: Pause Auto Save
Pause auto save
4.4.1: Set Timer...
Each 10, 20, 30 60 sec auto save timer.
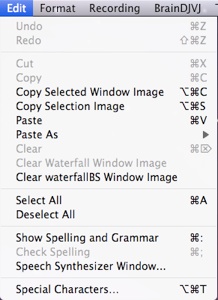
4.4: Edit
4.4.1: Undo Typing
Select "Undo Typing" or "Undo ... " works only for graph and text in the Brain Note document.
4.4.2: Redo
Select "Redo" works only for graph and text in the Brain Note document.
4.4.2: Cut
Select "Cut" works only for graph and text in the Brain Note document and movie window, Preferences / Note window.
When brain data file size is large "Cut" operation take time.
4.4.3: Copy
Select "Copy" works only for graph and text in the Brain Note document and movie window, Preferences / Note window.
When brain data file size is large "Copy" operation take time.
4.4.4: Copy Selected Window Image
Any windows image will copy.
4.4.5: Copy Selection Image
Any selection area will copy.
4.4.6: Paste
Select "Paste" works only for graph and text in the Brain Note document and movie window, Preferences / Note window.
4.4.7: Paste As
Select "Paste As" works only for graph and text in the Brain Note document and movie window, Preferences / Note window.
4.4.8: Clear
Select "Clear" clears the image on the 3D Water Fall window.
4.4.9: Clear 3D Water Fall Image
Select "Clear 3D Water Fall Image" clears the image on the 3D Water Fall window.
4.4.10: Clear 3D Water Fall Mixer Image
Select "Clear 3D Water Fall Mixer Image" clears the image on the 3D Water Fall window.
4.4.11: Select All
Select "Select All" works only for graph and text in the Brain Note document window.
4.4.12: Deselect All
Select "Deselect All" works only for graph and text in the Brain Note document window.
4.4.13: Spelling...
Select "Spelling..." works only for text in the Brain Note document window and Preferences / Note window.
4.4.14: Check Spelling
Select "Check Spelling" works only for text in the Brain Note document window and Preferences / Note window.
4.4.15: Speech Synthesizer Window...
Select "Speech Synthesizer Window" show window to speak text.
4.4.16: Special Characters...
Select "Special Characters..." works only for text in the Brain Note document window and Preferences / Note window.
4:5: Format
Use for graph and text object in the Brain Note document window.
4.5.1: Bring to Front
Select "Bring to Front" works only for graph and text object in the Brain Note document window.
4.5.2: Send to Back
Select "Send to Back" works only for graph and text object in the Brain Note document window.
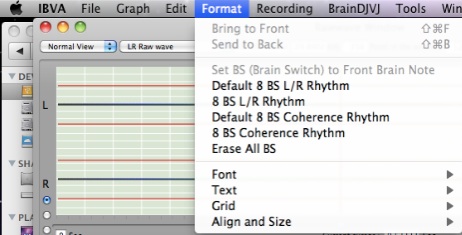
4.5.3: Set BS (Brain Switch) to Front Brain Note
Select "Default 8 BS L/R Rhythm" makes 8 Default BS for L/R Rhythm.
Select "8 BS L/R Rhythm" makes 8 set of BS for L/R Rhythm.
Select "Default 8 BS Coherence Rhythm" makes 8 Default BS for Coherence Rhythm.
Select "8 BS Coherence Rhythm" makes 8 set of BS for Coherence Rhythm.
4.5.4: Font
Select "Font" works only for text object in the Brain Note document window.
4.5.5: Text
Select "Text" works only for text object in the Brain Note document window.
4.5.6: Grid
Select "Grid" works only for Brain Note document window.
4.5.7: Align and Size
Select "Align and Size" works only for the Brain Note document window.
4:6: Recording
Use for brain wave recording and play back.
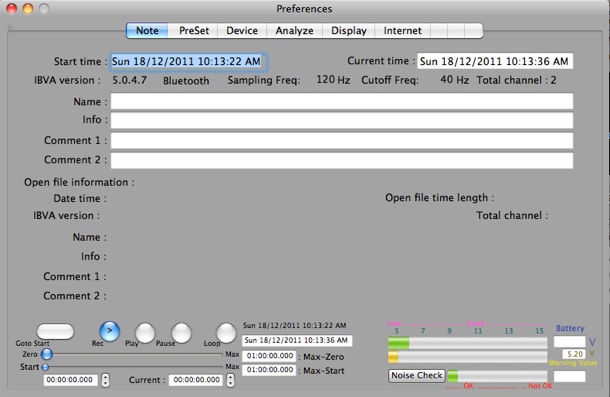
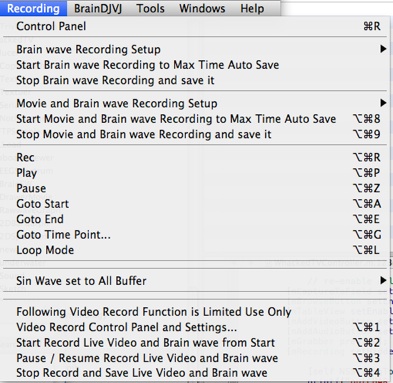
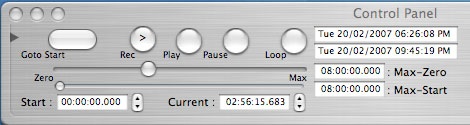
4.6.1: Control Panel
Show "Control Panel" for control recording and play back as Front window.
USB Serial IBVA hardware:
BlueTooth IBVA hardware: with Battery and Noise info.
Can set "Warning Value" in case it is necessary. type in number to change value. Default is 5.2V.
IBVA system works 5.2 V to 16V in this Battery indicator.
Actual input voltage is 0.8 to 0.5 V high. This is for diode protection drop voltage.
Click "Noise Check" Button start to show AC noise level.
In case AC noise get over 150 micro V, Bar color change to RED and alert message window will show up.
Check electrode and skin connection condition, try relocate IBVA unit then click OK to set AC noise less than 150 micro V.
In case IBVA unit set close to computer body (10 cm .. 20 cm), AC noise may increase.
After check noise and if it is less than 150 micro V, unchecked "Noise Check" Button to start monitor brain wave.
When click "Noise Check" Button max frequency of digital filter set to 60 Hz for monitor 50 Hz and 60 Hz AC noise.
After un click "Noise Check" Button max frequency will back to before click Button.
4.6.2.1: Brain wave Recording Setup
Setup brain wave recording Max buffer time. Max buffer time is depend on sampling frequency.
File size is depend on 2 channel mode, 4 channel mode and sampling frequency.
Clear All Recording Buffer, Clear Event Recording Buffer.
IBVA max recording time is 8 H.
4.6.2.2: Start Brain wave Recording to Max Time Auto Save
Start brain wave recording from beginning to Max buffer time.
Then Automatically Save it when end of Max buffer time.
File name will be : IBVAddmmyyyy-hhmmssAM/PM
In case select Loop mode, then back to time Zero and start recording keep continue.
That case File name will be : IBVAddmmyyyy-hhmmssAM/PM-XXXXXXXX.
XXXXXXXX is loop time. 0 to 99999999.
4.6.2.3: Stop Brain wave Recording and save it
Stop Brain wave recording and save it.
File name will be : IBVAddmmyyyy-hhmmssAM/PM
and/or in case loop mode then
File name will be : IBVAddmmyyyy-hhmmssAM/PM-XXXXXXXX.
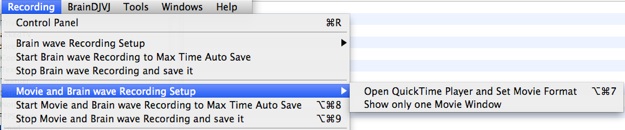
4.6.2.4: Movie and Brain wave Recording Setup
Setup Movie and brain wave recording.
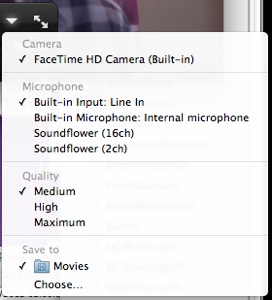
Open QuickTime Player and Set Movie Format.
Setup Camera, Microphone, Quality, Save to.
Save to location need to set default location : /Users//Movies/
In case you have movie with file name “Movie Recording”, then it will be overwrite with new recording movie file.
4.6.2.5: Start Movie and Brain wave Recording to Max Time Auto Save
Start Movie and brain wave recording from beginning to Max buffer time.
Then Automatically Save it when end of Max buffer time.
File name will be : IBVAddmmyyyy-hhmmssAM/PM
In case select Loop mode, then back to time Zero and start recording keep continue.
That case File name will be : IBVAddmmyyyy-hhmmssAM/PM-XXXXXXXX.
XXXXXXXX is loop time. 0 to 99999999.
Movie File name is same as Brain Note File name with extension .mov.
Movie location will be /User/Shared/
4.6.2.6: Stop Movie and Brain wave Recording and save it
Stop Movie and Brain wave recording and save it.
File name will be : IBVAddmmyyyy-hhmmssAM/PM
and/or in case loop mode then
File name will be : IBVAddmmyyyy-hhmmssAM/PM-XXXXXXXX.
4.6.3: Rec
Select "Rec" to start brain wave recording. Starts at current time point.
See: 5: Preferences. / 5.1: Note for graphic record mode control
4.6.4: Play
Select "Play" to start play back brain wave data. Starts at current time point.
4.6.5: Pause
Select "Pause" to stop brain wave recording and/or play back at current time point.
4.6.6: Goto Start
Select "Goto Start" time point goose to Start point.
4.6.7: Goto End
Select "Goto End" time point goose to Max time point.
4.6.8: Goto Time Point...
Show dialog to set goto time point.
4.6.9: Loop Mode
Select "Loop Mode" to set brain wave recording and/or play back mode to loop mode, when current time point goose to Max recording/play back Time, then time point goose to 0.
4.6.10: Sin Wave set to All Buffer
Set sin wave to all buffer include event buffer.
Sub menu for set sine wave frequency to Eye(0.5Hz), Delta(2.5Hz), Theta(5.5Hz), Alpha(10Hz),
BetaL(14Hz), BetaM(18Hz), BetaH(25Hz), Gamma(35Hz), AC Noise(50Hz), AC Noise(60Hz).
Amplitude set 5 to 30 micro V.
Left and Right phase set to 0 to 315 degree.
4.6.11: Sin Wave set to Sound Buffer
Set sin wave to Sound buffer..
Sub menu for set sine wave frequency 27.5 Hz to 21120 Hz.
Amplitude set 0.05 mV to 1V.
Left and Right phase set to 0 to 315 degree.
============================================
============================================
Following function 4.6.12: .. 4.6.15: with OSX 10.7 is limited use.
Max recording time will be depend on system configuration.
2 hour for 120 Hz sampling with OSX 10.7.
Need to test by your self for Max recording time.
And not recommended to use this function with OSX 10.7.
Use “4.6.2.4.. 4.6.2.6: Movie and Brain wave Recording Setup” is more nice speed and nice compression for make movie.
4.6.12: Video Record Control Panel and Settings...
Shows Video setting window. Setup Movie 1: Movie 2: Movie 3:
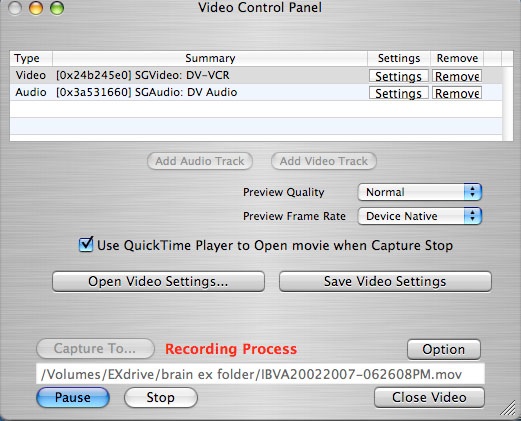
Click "Add Video Track" makes add video track.
Click Settings shows Video setting. Then shows Live Video window.
can use iSight camera and/or firewire Camcorder.
Click "Add Audio Track" makes add Audio track.
Click settings shows Audio setting.
Click "Record" start capture Video to /Users/Shared/IBVA.mov.
Click Stop to stop capture.
All this window settings can save and open.
Preview Quality, Preview Frame Rate.
Click "Remove" to remove track.
Click "Close Window" to close this window. in case any track use then doesn't close.
need to "Remove" all track to close window.
need to use fast speed Mac for capture image.
make sure to use big size hard drive.
4.6.13: Start Record Live Video and Brain wave from Start
Use this menu for synchronize recording of video and brain wave.
Recording start from Start time point.
Before start recording make sure to set Capture movie location and hard disc space.
Movie size is depend on compression mode and light condition.
following is example movie size and time long.
Max video and brain wave recording time is 8 Hour with OSX 10.5, 10.6
Max video and brain wave recording time is 5 Hour with OSX 10.7
Default compression :
8 H : 300 GB
4 H : 150 GB
2 H : 66 GB
1 H : 33 GB
Photo JPEG :
8 H : 20 GB
4 H : 11 GB
2 H : 5 GB
1 H : 2.5 GB
When recording get to the end of buffer automatically ask for select "Stop Record and Save Live Video and Brain wave" for save Brain note file and Movie file.
QT movie name and Brain note file name is same.
Based on save start date and time.

4.6.14: Pause / Resume Record Live Video and Brain wave
Pause / Resume record video and brain wave.
4.6.15: Stop Record and Save Live Video and Brain wave
Stop recording and save Brain note file and Movie file.
When open BrainNote file automatically open movie file.
For works this way Movie file need to be same location and/or same location as BrainNote file.
And can not change Movie file name for this operation.
Can change BrainNote file to any name and any location.
In case move Movie file to different location then open BrainNote file couldn't find out Movie file. In this case you need to open movie with "BrainVJ/Select AV..." then set "Movie & brain wave Time Sync" in the Movie window drawer.
4:7: BrainDJVJ
4:8: Tools
Use tools.
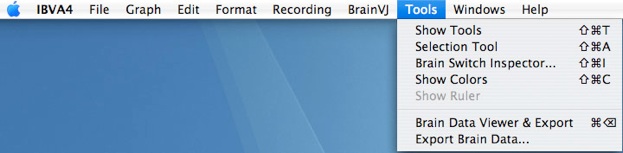
4.8.1: Show Tools
Select "Show Tools" show Tools for Brain Note editing.
4.8.2: Selection Tools
Select "Selection Tools" select Selection Tools in the Tools.
4.8.3: Brain Switch Inspector...
Select "Brain Switch Inspector..." shows Brain Switch Inspector window to see Brain Switch attribute in the Brain Note window.
See 16: Brain SW inspector
4.8.4: Show Colours
Select "Show Colours" shows Colour window for edit colour.
Need to select object then select Show colours to change colour.
4.8.6: Show Ruler
Select "Show Ruler" shows Ruler in the Brain Note window.
4.8.7: Brain Data Viewer & Export
Select "Brain Data Viewer & Export" shows Brain Data Viewer & Export window.
See 17: Brain Data viewer and Export Brain Data
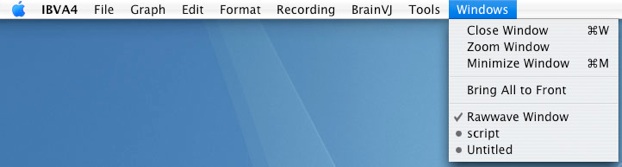
4:9 Windows
Window operation.
© Psychic Lab Inc. Masahiro Kahata 2005 .. 2014
4: Menu